I finally have some time to catch up and post my last few tags of the 12 Tags of Christmas that I followed on T!m Holtz' blog.
Tag 6:
I didn't have glossy paper or foil paper so I thought, why not try tin foil and see what the results will be? I also just bought myself a BIGKick since my Cricut died but I only had a couple of texture folders.
I glued the tinfoil to a piece of card stock, texturized it, embossed it and then painted it with a couple of colours.
It still didn't look right to me so I fussy cut out the 'snowflake' and then cut it to size and glued it to the tag. I spritzed the tag with pearl mist and embellished the tag and I was done. Not quite the same as the one on the blog but I think the results aren't too bad either.
Tag 7:
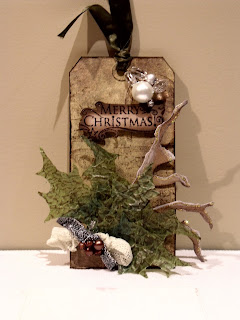
I created the leaves on this tag using a leftover glassine bag that I got from my Thankful Journal kit and opened it up and swiped distress ink over it and then heated the glassine to bond the ink to the paper.
I don't have any die cuts yet so I googled an image of the branch die and printed it out and fussy cut it.
Tag 8:
For this tag I made the word 'Joy' from some of my chipboard letters from my stash, inked it black and then used glossy accents on it.
Having no gear dies, I found a couple of embellishments that imitated the look using a brad to hold them together.
Tag 9:
Fussy cut the candle image out. Used letters and flourish from my stash. And used glossy accents all over.
My bling on the flourish is from my i-rock gem setter.
Tag 10:
I made the customized transparency (the 'facet' on the right) just as instructed on the blog which was really cool. I'd like to try that technique again for other projects. I didn't have a facet but I did have a small mirror embellishment and I cut my transparency to size and then used glossy accents on the picture to imitate the facet. (I think glossy accents is my new life saviour!)
The 'facet' on the left is an embellishment.
The banner is an image I printed out and stamped to recreate the look of the banner on the blog.
The word 'believe' are various chipboard letters from my stash that I painted gold and then applied glossy accents to.
Tag 11:
Not having glossy paper, I thought I would try photo paper. The result wasn't too bad except the 'bleach' effect of spraying a few droplets of water on the tag didn't work, so I sprinkled droplets of white paint.
My stamps weren't large enough to cover the tag, perhaps I should have added one more image but I left it as is.
Tag 12:
To imitate the tissue paper and script stamp effect, I found both images and downloaded it. For the script on the tag, I ran the tag through the printer as I printed off the script image and then for the music on tissue paper, I taped some blank white tissue paper to regular printer paper and then ran that through my printer as I printed off the music image.
I made some more printed tissue paper the same way so that I could make the flower.
For the word 'wish' I took the letters from my stash again and painted them silver. For the black shadows, I used the negatives from my chipboard stash, traced the letters onto black card stock and cut them out.
I didn't have the fractured doll so I looked at other people's ideas from Tim Holtz' blog and decided to used an image of the sewing die, printed it and cut it out, painted it white, distress it a bit then used glossy accents to create a faux ceramic.
The wings and crown are stickers I put on white card stock, cut out and distressed.
I'm now all finished! Yay!
Now onto Project Life!
=) Lisa


No comments:
Post a Comment